Showing posts with label 2 week wear test. Show all posts

Tuesday, 15 November 2016

Essie Gel Couture

Hello everyone, no doubt you have all seen or heard about the new Essie gel couture line and today I have review of it for you. Personally, I have seen so many reviews and I really just wanted to try it out myself and see how it holds up. Some basics behind this two step system is that it comes with one color coat and a top coat. The main claims behind this line is that you are supposed to be able to get 14 days of wear and an instant gel-like shine. Which means it is another nail polish system that is supposed to give you a gel-like manicure without the need of a UV or LED light. An interesting feature behind the polish is that the barrel and brush are completely different from what you normally see from Essie. The brush is very wide so that you can do your whole manicure with a few easy swipes. In addition, the barrel is supposed to be curved in a spiral so that any polish on the barrel is deposited onto the brush in a way as to not flood your cuticles. 

Before talking about the formula and wear test I want to mention my experiences with the features of this line. The spiral barrel was only on the color coat which was really disappointing to me because it ruined the continuity of the bottles for me. The top coat can still flood your cuticles and cause your manicure to chip or peel from the cuticle line. So I did not understand why they did not keep the same barrel. In addition, while doing research on the line, I found that one of the reasons Essie chose the brush was that so it could form to different nails. You are supposed to be able to compress or flatten the brush by wiping it on the bottleneck to get the shape that you need. I felt that was really hyped up, the brush did not show any particular flexibility nor did it hug my nail spectacularly enough for me to attribute to this Essie brush only.

Two coats of hang up the heels

The formula of the nail polish was really lovely. It absolutely glided onto the nail and applied pretty evenly. This shade in particular is a gorgeous black with a green shimmer. The green is visible in direct light but this shade looks black otherwise. The top coat was a great success for me, it did not disturb the layer of color I had underneath and dried fairly quickly. I really loved the shine that the top coat gave me, so much so that I would use this top coat separate of this system. 

Day nine 

I did not make it to 14 days, but I really feel like this color would have lasted nicely up to that point. My nails first chipped in the morning of the ninth day of wear. Usually when I get a chip, the polish will just continue to chip away at that point, however I wore this polish until day ten and found that the chip did not spread. The tip wear you are seeing on my other fingers started being prominent around day four or five. But the tip wear was not enough to make my manicure look bad.

The reason I did not take a picture of day ten wear was because it looked the exact same as day nine. I only decided to end my wear test because I was tired of the color and the space between my cuticle and the polish was getting too big for me. Also, once it chipped I just wanted a fresh manicure. Overall, this polish lasted beautifully for me and I would 100% recommend it to others. I don't want to compare this to the Wet n Wild one step wonder gel because that is an unfair comparison considering this is a two step system. But in comparison to the Sally Hansen miracle gel, I enjoy this line ten times better. While both the systems last fairly similarly over ten days in terms of chips and tip wear, the miracle gel cracked on me. The Essie gel couture did not crack and in addition, the top coat for this line performed very well. Whereas the miracle gel top coat actually ruined my manicure. So if you are wondering which between the two works better as a system and overall, I would recommend the Essie gel couture. 

Now to discuss prices; I have seen the individual color coats and top coat retail for around $12-14 CDN. There is also a set which includes a top coat and a color coat for around $24-26 CDN. It is an investment to make but I do think you will be pleasantly surprised by the wear of this line. If you have tried out this line, leave me a comment about how you found it!

Saturday, 10 September 2016

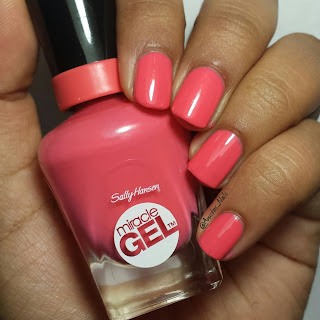
Sally Hansen Miracle Gel

Hello, hello everyone,

I have a review for you today on the Sally Hansen miracle gel system which includes a wear test. Now I know that this system has lots of reviews, some sponsored and some very negative ones. As for myself, one of my very close friends uses the miracle gel polish and the Sally Hansen insta-dry top coat. She works as a lifeguard and regular nail polish does not last on her as long as the miracle gel does. So I thought it was high time for me to test it out. I picked up the shade Pretty Piggy and I got the regular miracle gel top coat, not the 2x volume top coat.

This set typically retails for $15 to $17 CDN in various stores. The main claims behind this system is that you can get 14 days of color and shine without a light to cure it. Also it is supposed to be more chip resistant that regular nail polish while being easy to remove. I have prepped my nails using Pretty Womans nail detox and will be testing two top coats as well as no top coat.

Two coats of Pretty Piggy

The application for this shade was really lovely, it has the same brush as their complete salon manicure line so it covers the nail very easily. This particular shade was really opaque on the first coat and fully opaque on the second. The polish itself dried very quickly and with ease. Now, because I wanted to give an in depth review, I put the miracle gel top coat on my thumb and middle finger. On my pointer and ring finger I have used seche vite. And lastly, on my pinky I have no top coat.

So starting with the pinky, you will notice a crack near the tip and that was due to user error and does not reflect on the polish itself. The shine was a very good amount, the same as the miracle gel top coat in my opinion. As for the pointer and ring finger, seche vite dried very quickly and has a high shine finish. The miracle gel top coat on the other hand, did not work out so well. In the bottle I had noticed it was very thin and heard that it can smudge your nail so I applied a thicker coat so as to avoid smudging. It did not work at all. No matter how dry my polish was underneath, the miracle gel top coat smudged it so badly that it created patches if you look up close. Also even though my base color was dry, my brush still got stained pink. Dry time was fairly long, when I had thought it was dry I could still leave fingerprint marks and then smooth them out. The shine was also fairly nice.

Day three, my right hand (my dominant hand).


Day three, my left hand.

By day three my manicure was still looking very fresh with minimal tip wear on my right hand. On day four however, I did notice that the polish had started to crack on my left thumb and both of my middle fingers, which all had the miracle gel top coat. On day five, the cracking had also shown up on my right thumb and both my pinkies which had no top coat.


Day eight, my right hand (my dominant hand).


 Day eight, my left hand.

 By day eight, I had noticeable tip wear on my right hand and minimal wear on my left. While my manicure looked nice because there was no chipping, the cracking was really noticeable and ruined the manicure for me. It looked worn out even though the shine was still prevalent. And it was on all my fingers except for my pointer and ring which were topped with seche vite.


Day ten, my right hand (my dominant hand). 

Day ten, my left hand.

I did not make it to day 14 because the chipping on my middle finger kept spreading and the cracking of the nail polish just looked horrible in person. Overall, even after ten days, I thought it had held up nicely especially when topped with seche vite. The color was still vibrant and there was still a good amount of shine on all of my fingers. It also did remove easily.

The miracle gel polish itself, is definitely something I would recommend. Looking at the polish itself, I did not have any issues with it until day five which is pretty amazing considering I had no base and top coat. The color popped and the shine was still there to make it look like a gel manicure. To extend the life of the manicure, I would recommend you use either seche vite as I did or try your own top coat. I think if I had used seche vite on all ten fingers, I would have made it through 14 days without my manicure looking horrible.

As for the miracle gel top coat, save your money and effort. The top coat smudged my nail color to the point where it reduced the opacity of the coat I already had on; so it would be horrible for nail art. It also took longer than the nail color to dry. The worst part is that on me, it caused my manicure to crack two whole days before my finger that had no top coat! So save your money on the top coat and just buy another color you like.

I will for sure buy more miracle gel colors because I was impressed with the formula and wear time. When I want my manicure to last I will reach for this and my own preferred top coat. If you've used the 2x volume top coat or have used this system, I'm curious to see how you found it so leave me a comment below!

Thursday, 24 March 2016

Wet n Wild 1 Step Wonder Gel swatch and review

(L-R Left Marooned, Condensed Milk, Stay Classy, Pretty Peas, Lavender out Loud)


Hello everyone, hope you are having a wonderful day. Two weeks ago, I wandered to my local Loblaws Superstore and found that they had the new Wet n Wild 1 Step Wonder Gel for $6 CDN and of course, I grabbed as much as I could.These polishes are supposed to mimic a true UV cured gel polish without the use of a UV light. So if you are interested in seeing my swatches, pros and cons, as well as the results of my 2 week wear test, just keep reading!

So lets start with some swatches, the range of this product consists of 18 different shades however, I only picked up 5.


Starting with the lightest shade I picked up, this is condensed milk. I did use three coats for this swatch and if you look carefully, you will see that there are still some spots where the polish is not completely opaque. Furthermore, the color that you see on my nails is lighter than the color you see on the bottle.


Next we have pretty peas, which is a beautiful seafoam green. I did use three coats for my swatch and I was able to get it fully opaque but I tried not to overwork the polish. On the first and second coat, I found that the more I brushed the polish, the streakier it got. Therefore I would recommend using the three strokes method with this particular color.


Stay classy is a wonderful mauve shade, and had the best formula of the bunch. It was almost opaque in one coat, however I did use two. This is the shade I chose for my wear test so you will be seeing it again soon.


Lavender out loud is probably the second best of the bunch but did need two coats to be fully opaque. It is a light and sightly dusty purple.


Last we have the worst of the bunch, left marooned. This was opaque in two coats but the formula was really tricky to work with so you might need three. This was incredibly hard to photograph using my regular lights, so I also took a picture in the sun.


 Nope, I did not change my polish. Left marooned is a cherry red. This color did not deepen on a third coat, and as you can see the color is nowhere near the same as the label. Also as I mentioned, the formula was tricky; it was goopy and hard to work with.

Next, lets talk about the wear test I did; I wore stay classy for 2 whole weeks with no base or top coat.


Say hello to my Cinderella hand, this picture was taken 9 days later. I do have a disclaimer, I hit my hand while closing a cabinet and I bent the nail on my middle finger which resulted in the chips you can see on the side. So please keep in mind that those chips have nothing to do with the formulation of the polish itself. Overall, I have to say I was definitely impressed by this polish. I do have a good amount of tip-wear, but this my dominant hand  and for nine days, it really held up well. As for the shine, I felt like I had the same amount of shine as the day I applied it.


Day 14, as you can see the chips on the side of my middle finger have gotten worse. I have more tip-wear and some chips on the sides of my other nails. However, the shine is still pretty prevalent and after fourteen days, I'm still impressed.

Overall, this polish by Wet n Wild has three main claims; color and shine for up to 2 weeks, no base or top coat needed, and easy removal. It has been my experience that all of those claims were true. After two weeks, it's still on your nails and it was a easy one step process. A lot of the time, if you don't use a base or top coat to extend the life of your manicure, your polish won't last for even a week. Also it did remove as easily as regular nail polish.

To wrap up, lets talk about some pros and cons, starting with the cons. $6 is expensive for Wet n Wild, their regular megalast polishes retail for about $3 CDN. This polish is really prone to bubbling, you really have to let it sit before you go in to paint your nails. The bubbles show up easy and since there is no top coat, you can't smooth out the polish is you do get the bubbles. No top coat also means that the shineyness of the polish itself is all you have, so if it's too dull for you, this line doesn't have a top coat for you to add on top. My major con with this line, is that since the bottles are opaque (the lacquer is light sensitive) you really depend on the sticker to depict the color. And while I can overlook the variation on condensed milk; it was a little lighter than the label, left marooned was really off. The label showed a classic maroon shade and the polish itself turned out to be a cherry red. So, what you see on the sticker, is not necessarily what you get.

To end on a positive note, I have a lot of pros for you. As you could see from my wear test, the polish did last a really long time. I got tired of the color long before I thought the manicure looked bad. For four out the five polishes I used, they applied really smoothly, self leveled nicely, no issues. The brush is the same as their megalast brushes so you can cover your nail easily. The polish also dries really fast! It is supposed to cure from regular ambient light or sunlight and I found that I only had to wait a handful of minutes in between coats and in the end.

While $6 is expensive for Wet n Wild , if you consider the other brands in the drug store, none of them have this kind of gel formula. To name a few, Sally Hansen Miracle Gel is a two step process; the polish and the top coat. Loreal Gel-Extraordinaire is a three step process;  base coat, polish, and top coat. Even Essence, gel nail polish has a base coat and top coat in addition to the colors. Therefore, since you only have to purchase the color you like, it is still an affordable polish.

Overall, I think this product is a 4/5 and my favorite color is pretty peas. Thank you so much for reading my review, if you've tried any of these comment below and let me know your thoughts!