Hello, hello everyone,
I have a review for you today on the Sally Hansen miracle gel system which includes a wear test. Now I know that this system has lots of reviews, some sponsored and some very negative ones. As for myself, one of my very close friends uses the miracle gel polish and the Sally Hansen insta-dry top coat. She works as a lifeguard and regular nail polish does not last on her as long as the miracle gel does. So I thought it was high time for me to test it out. I picked up the shade Pretty Piggy and I got the regular miracle gel top coat, not the 2x volume top coat.
This set typically retails for $15 to $17 CDN in various stores. The main claims behind this system is that you can get 14 days of color and shine without a light to cure it. Also it is supposed to be more chip resistant that regular nail polish while being easy to remove. I have prepped my nails using Pretty Womans nail detox and will be testing two top coats as well as no top coat.
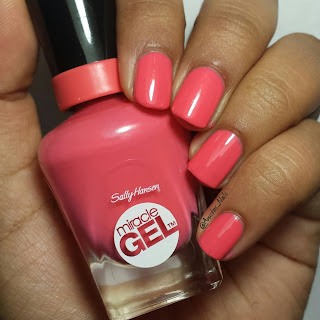
Two coats of Pretty Piggy
The application for this shade was really lovely, it has the same brush as their complete salon manicure line so it covers the nail very easily. This particular shade was really opaque on the first coat and fully opaque on the second. The polish itself dried very quickly and with ease. Now, because I wanted to give an in depth review, I put the miracle gel top coat on my thumb and middle finger. On my pointer and ring finger I have used seche vite. And lastly, on my pinky I have no top coat.
So starting with the pinky, you will notice a crack near the tip and that was due to user error and does not reflect on the polish itself. The shine was a very good amount, the same as the miracle gel top coat in my opinion. As for the pointer and ring finger, seche vite dried very quickly and has a high shine finish. The miracle gel top coat on the other hand, did not work out so well. In the bottle I had noticed it was very thin and heard that it can smudge your nail so I applied a thicker coat so as to avoid smudging. It did not work at all. No matter how dry my polish was underneath, the miracle gel top coat smudged it so badly that it created patches if you look up close. Also even though my base color was dry, my brush still got stained pink. Dry time was fairly long, when I had thought it was dry I could still leave fingerprint marks and then smooth them out. The shine was also fairly nice.
Day three, my right hand (my dominant hand).
Day three, my left hand.
By day three my manicure was still looking very fresh with minimal tip wear on my right hand. On day four however, I did notice that the polish had started to crack on my left thumb and both of my middle fingers, which all had the miracle gel top coat. On day five, the cracking had also shown up on my right thumb and both my pinkies which had no top coat.
Day eight, my right hand (my dominant hand).
Day eight, my left hand.
By day eight, I had noticeable tip wear on my right hand and minimal wear on my left. While my manicure looked nice because there was no chipping, the cracking was really noticeable and ruined the manicure for me. It looked worn out even though the shine was still prevalent. And it was on all my fingers except for my pointer and ring which were topped with seche vite.
Day ten, my right hand (my dominant hand).
Day ten, my left hand.
I did not make it to day 14 because the chipping on my middle finger kept spreading and the cracking of the nail polish just looked horrible in person. Overall, even after ten days, I thought it had held up nicely especially when topped with seche vite. The color was still vibrant and there was still a good amount of shine on all of my fingers. It also did remove easily.
The miracle gel polish itself, is definitely something I would recommend. Looking at the polish itself, I did not have any issues with it until day five which is pretty amazing considering I had no base and top coat. The color popped and the shine was still there to make it look like a gel manicure. To extend the life of the manicure, I would recommend you use either seche vite as I did or try your own top coat. I think if I had used seche vite on all ten fingers, I would have made it through 14 days without my manicure looking horrible.
As for the miracle gel top coat, save your money and effort. The top coat smudged my nail color to the point where it reduced the opacity of the coat I already had on; so it would be horrible for nail art. It also took longer than the nail color to dry. The worst part is that on me, it caused my manicure to crack two whole days before my finger that had no top coat! So save your money on the top coat and just buy another color you like.
I will for sure buy more miracle gel colors because I was impressed with the formula and wear time. When I want my manicure to last I will reach for this and my own preferred top coat. If you've used the 2x volume top coat or have used this system, I'm curious to see how you found it so leave me a comment below!


